Running a handmade jewelry brand includes 7 jobs after the clay is baked:
(1) product photography, (2) photo editing, (3) SKU + inventory notes, (4) SEO product descriptions, (5) website listing + categorization, (6) shipping + policies, and (7) pricing that accounts for time, fees, and overhead.
This post breaks down my repeatable workflow—from finished polymer clay earrings to a live online shop—so customers (and search engines) can understand, trust, and buy what you make.

- The 7-Step Workflow After You Finish Making the Earrings
- Step 1 — Photographing Jewelry at Home (2 Reliable Setups)
- Step 2 — Editing Photos Without Losing Material Truth
- Step 3 — Writing Product Descriptions That Sell and Rank
- Step 4 — Publishing the Listing (Categories, Tags, Variations)
- Step 5 — Pricing for Profit (Not Just Materials)
- Step 6 — Website Maintenance as a Maker (WordPress/Elementor)
- Step 7 — Visibility: Blog Posts as Business Infrastructure
- Common Questions About Selling Jewelry Online
- Final Perspective: Consistency Is the Key to Growth
The 7-Step Workflow After You Finish Making the Earrings
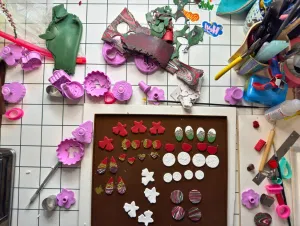
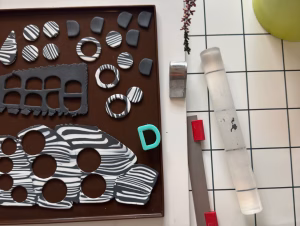
Once your earrings are baked and assembled, your role shifts from maker to publisher. This stage is about accuracy and findability. While the creative side is about your hands, the commercial side is about your data: photos, specs, names, and structure.
To keep every collection consistent (and to avoid “Where did I put that file?” chaos), I run the same checklist for each batch:
- Capture high-resolution images using controlled lighting
- Refine visual assets through non-destructive photo editing
- Document technical specifications for every unique earring style
- Draft search-optimized descriptions for each product page
- Upload digital listings to your WordPress shop structure
- Calculate final retail prices based on labor and overhead
- Add internal links so new pieces connect to existing guides and collections
Who this is for: Independent makers transitioning from a hobby to a structured online shop.
Estimated time per batch: 4–6 hours for ~10–16 pairs (photography + editing + listings included).
(Your first few batches may take longer. That’s normal—speed comes from systems, not hustle.)
Step 1 — Photographing Jewelry at Home (2 Reliable Setups)
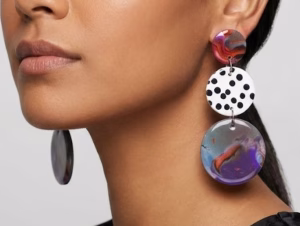
To photograph handmade earrings at home, I use one consistent catalog setup (lightbox) and one consistent wear-context setup (ring light), then I repeat the same angles for every pair.
If there’s one truth about online selling, it’s this: photos do most of the talking. High-quality images reduce the “Is this going to look cheap in real life?” fear that customers feel when they can’t hold the product.
Before you shoot, do a quick “product prep” pass:
- Wipe fingerprints (polymer clay and resin love to show smudges)
- Check dust or lint (especially on darker colors)
- Make sure findings are straight and centered
- Confirm pairs match (color, shape, gloss level)
Lightbox setup for consistent catalog photos
A lightbox is my go-to for “clean” product shots. It provides diffused, even lighting that eliminates harsh shadows and makes the edges of the earrings crisp.
How I keep the look consistent:
- Place the earrings centered so the lens doesn’t warp the shape near the edges
- Use the same background color every time (grey is easiest for catalogs)
- Keep the camera angle level so the pair looks symmetrical and professional
My standard catalog photo angles
- Front-facing (the “main image” that sells the shape)
- Side view (shows the post, clasp, or backing—this builds trust)
- Detail/texture shot (lets people see surface character and finish)
Extra tip for accurate color:
If your colors vary from real life, the issue is usually lighting temperature or white balance. The goal isn’t “pretty.” The goal is true.

Ring light setup for “wear-context” photos
Customers need to see how earrings actually hang. “Wear-context” shots answer questions like:
- Are they long enough to be statement earrings?
- Do they sit close to the jaw or hang lower?
- Are they chunky or airy?
- Do they move nicely?
I position my ring light about 40–60 cm from the subject to create bright, even fill. I keep the color temperature between 3,200K and 5,600K (depending on the room and time of day) so the clay colors stay as close to reality as possible.
My wear-context essentials
- On-ear shot (front) to show length relative to face
- Slight turn (45°) to show shape depth
- Movement shot (a tiny head turn or step) to show swing and weight visually
Quick comfort note you can mention in listings:
If your earrings are truly light, say so (and back it up with a weight range). Comfort sells—especially to people with sensitive lobes.
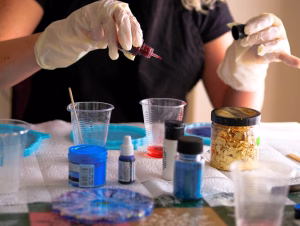
Step 2 — Editing Photos Without Losing Material Truth
The goal of post-production isn’t to make the earrings look “perfect.” It’s to make them look accurate. Over-editing can lead to mismatched expectations and “item not as described” complaints—plus it quietly damages trust even when customers don’t say it out loud.
I keep my workflow simple, repeatable, and honest.
White balance & exposure
- Remove yellow/blue casts so the background looks clean
- Adjust exposure so the product is clear without blowing out highlights
Texture preservation
- I never “smooth” polymer clay digitally
- I avoid heavy filters that erase handmade character
- If there’s a real tiny flaw, I’d rather photograph it well than blur it away
Consistency edits (the underrated part)
This is what makes a shop look professional:
- Same crop ratio across products (so your grid looks cohesive)
- Similar brightness and contrast from listing to listing
- Similar spacing around the earrings
Exports for web (practical, not technical)
I export images sized for fast loading while keeping details crisp. The goal is: clear texture + quick page speed. Slow pages lose buyers.
Where I edit and design
- Affinity Photo: white balance, background cleanup, small corrections
- Canva: banners, collection headers, promo graphics
- Gemini (or any assistant): quick brainstorming—like testing title ideas or checking if color descriptions match the vibe
Step 3 — Writing Product Descriptions That Sell and Rank
To help shoppers decide (and help search engines categorize the listing), I include specific attributes that answer the most common buyer questions. Think of the description like a helpful in-store conversation—just written down.
I also like using a consistent “verb + noun” structure in feature lists because it reads cleanly and feels trustworthy.
What I include in every listing
Closure type
- Specify stud, hook, hoop, or huggie
- Mention backing type if relevant (butterfly backing, silicone stopper, etc.)
Findings and sensitivity notes
- Confirm hardware material (stainless steel, gold-filled, etc.)
- If you claim “hypoallergenic,” only do it when verified
- If you mention nickel-free, keep it accurate and simple
Dimensions (always)
- Drop length in mm and inches
- If width matters (arches, circles, big shapes), include it too
Weight range
- You don’t have to be hyper-precise—just give a reliable range
- Example: “ultra-lightweight, under 5g per pair” (only if true)
Finish
- Matte, glossy, resin-coated, or mixed finish
- If resin is used: “resin-coated for shine” is a strong clarity statement
Collection story (the human part)
Two sentences is enough. This is where people connect:
- What inspired the palette?
- What’s the mood—fresh, earthy, playful, minimal?
Care instructions
- Water exposure guidance
- Perfume/hairspray note
- Heat + storage tip
A quick listing structure that works well
- 1–2 sentence intro (what it is + who it’s for)
- Bullet specs (finish, findings, dimensions, weight)
- Care + processing time
- Collection story (short, warm, specific)
You can be poetic, but clarity comes first.
Step 4 — Publishing the Listing (Categories, Tags, Variations)
This is where the invisible organization work happens—the part that makes your shop feel easy to browse and easy to trust.
SKU + inventory notes (the “maker sanity” system)
This is the part most people skip… until they have 30 listings and can’t remember what’s what.
Simple SKU format idea:[Collection]-[Shape]-[Color]-[Finish]-[Batch]
Example: SPP-ARCH-EMGR-MAT-B12
Inventory notes I track
- Number of pairs available
- Findings type (and where I bought them)
- Weight range + size notes
- Photo set name (so I can find the originals fast)
- Restock time estimate
- Any “special” notes (resin-coated, limited colors, etc.)
This isn’t busywork. It prevents mistakes, saves time, and makes your shop easier to run.
Listing structure that helps both customers and Google
Naming conventions
I use clear titles like:
[Color/Pattern] + [Material] + [Shape/Style] + [Type]
Example: “Emerald Green Polymer Clay Arch Dangle Earrings”
That’s more searchable than “Forest Dream Drops,” and it still sounds beautiful because the design carries the romance—not the vagueness.
Collections as entities
Grouping products under a theme like “Spring Pastels Collection” helps customers browse and helps search engines understand relationships between products. You can see how these naming and categorization rules come together in practice by browsing the latest designs in my webshop.
Processing & shipping clarity
- Processing time (example: 1–3 business days—use your real number)
- Packaging notes (eco mailers, branded cards, gift-ready options)
- A short returns/exchanges note that links to your policy page
Alt text (for accessibility + image discovery)
Alt text should describe what the photo shows in plain language:
- “Pink polymer clay arch dangle earrings on white background”
- “Polymer clay stud earrings back view showing stainless steel post”
Step 5 — Pricing for Profit (Not Just Materials)
Handmade jewelry profit =
(price × units) − (materials + packaging + shipping supplies + platform fees + payment processing + your labor time).
If you don’t price your time—even at a beginner hourly rate—you’ll accidentally build a business that only works when you burn out.
What I include when pricing
- Materials (clay, resin, findings, sandpaper, blades—everything)
- Packaging (mailers, tissue, cards, labels)
- Fees (payment processing, platform fees if applicable)
- Labor (making + assembly + photos + editing + listing time)
- Overhead (website hosting, tools, replacements, subscriptions)
A helpful sanity check
After you price a pair, ask:
- “What’s my profit per hour if this sells?”
- “If I sell 10 pairs, does the batch profit cover the time?”
- “Can I reinvest in supplies without panic?”
Pricing isn’t just math. It’s sustainability.
Step 6 — Website Maintenance as a Maker (WordPress/Elementor)
Building my site with WordPress and Elementor Pro was a long-term autonomy move. Hiring professional help can cost thousands, and I’d rather invest that money into materials, equipment, and growth.
Here’s what “maintenance” actually looks like in real life:
Seasonal updates
- Swap homepage banners for launches and holidays
- Update featured collections (so your shop doesn’t look stale)
Responsive design checks
- Make sure buttons are clickable on mobile
- Confirm product photos aren’t cropped awkwardly
- Test checkout quickly (yes, even when it’s annoying)
Internal linking
- Link product pages → care guide
- Link collection pages → style guide
- Link blog posts → category pages → products
This is how a site becomes a system—not just a gallery.
Step 7 — Visibility: Blog Posts as Business Infrastructure
I don’t write blog posts just for “content.” I write them as infrastructure. Building this infrastructure starts with the ‘Who’ behind the brand; I’ve shared more about my studio’s philosophy and my journey as a maker on my Services page.
A good post creates a path:
- A reader searches a question
- They find your blog post
- The post leads them to a collection
- The collection leads them to a product
- The care guide and policies remove hesitation
- The buyer feels confident
Here’s an example path that’s easy to build:
- Blog Post: “How to Style Statement Earrings”
- Category Link: Statement Collection
- Product Link: The exact pair featured in the post
- Care Guide: How to store, clean, and wear polymer clay jewelry
- Policy Link: Shipping + returns for pre-checkout confidence
You’re not “blogging.” You’re building a navigation map for humans and machines.
Common Questions About Selling Jewelry Online
Jewelry Photography Tips
How do you photograph earrings on a white background?
Use a lightbox (or diffused window light) to spread light evenly and reduce harsh shadows. Focus on getting the background clean in-camera first, then correct white balance so the white looks natural—not gray or yellow.
How do I show the size of earrings in photos?
Include a scale shot with a ruler or a standard coin, and pair it with an on-ear photo. The combo solves both “exact measurement” and “real-world look” in a way shoppers instantly understand.
What lighting is best for reflective jewelry?
Diffused lighting is your best friend. A lightbox or softened ring light reduces glare hotspots on resin and metallic findings while keeping edges sharp and textures visible.
Do I need a DSLR to take good product photos?
Not necessarily. A modern phone camera can work extremely well if your lighting is controlled and your shots are steady. Lighting and consistency matter more than the camera body.
SEO & Descriptions
What should a handmade earring description include?
A high-converting description should include drop length, weight range, closure type, findings material, finish, care notes, and processing time. Add a short collection story for emotional connection—then keep the rest clear and scannable.
How do you write SEO titles for jewelry listings?
I use a descriptive formula: [Color/Pattern] + [Material] + [Style/Shape] + [Jewelry Type].
Example: “Emerald Green Polymer Clay Arch Dangle Earrings” will show up for more relevant searches than a poetic title that doesn’t describe the item.
Does alt text actually matter?
Yes—especially if you want your images to be discoverable and your site to be accessible. Good alt text is simply a clear description of what’s in the image.
Profitability & Pricing
Is selling handmade jewelry profitable?
It can be—if you price beyond hobby-level and account for time, fees, and overhead. Profit comes from systems: batch workflows, consistent publishing, and pricing that includes labor.
What expenses do jewelry makers forget?
Indirect costs are the sneaky ones: website hosting, domain renewals, subscriptions, packaging supplies, tool replacement, and the hours spent editing and listing. Small costs become big leaks when they repeat every week.
How do I stop underpricing without scaring customers away?
Raise clarity before you raise price: improve photos, add specs, show craftsmanship, and write confident descriptions. When your listing communicates value clearly, pricing feels fair instead of surprising.
Final Perspective: Consistency Is the Key to Growth
Building an online shop for handmade jewelry is a technical marathon that begins the moment the oven timer dings. When you treat your publishing workflow with the same precision you apply to your clay—measuring weight, recording dimensions, keeping lighting consistent, and writing clear specs—you turn a creative output into a professional catalog people can trust.
The transition from maker to business owner is defined by these “invisible” steps. And the payoff is real: a sustainable, autonomous brand that resonates with human customers and makes sense to search engines.
Success in handmade isn’t usually one viral moment. It’s the quiet compounding of a disciplined workflow—one batch at a time—until casual browsers become confident collectors.