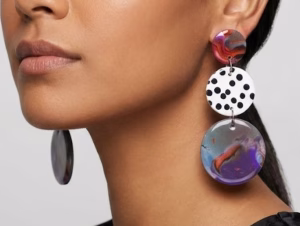

I didn’t plan on going full wild-print mode this fall, but here we are — surrounded by zebra stripes, leopard spots, and way too many shades of brown clay. TheI didn’t plan on going full wild-print mode this fall, but here we are — surrounded by zebra stripes, leopard spots, and just enough shimmer to make things interesting. The Wildberry Collection came together almost by accident, inspired by the contrast of black, white, gold, and brown — bold but still earthy, wild but wearable.
Skill Level: Beginner → Intermediate
Bake Temp: 110–130 °C (230–275 °F)
Time Needed: Around 1–2 hours (plus resin cure)
Perfect For: Anyone who loves neutral tones, statement earrings, and animal print with a handmade twist.
There’s something about fall that always makes me want to slow down and make things by hand. Maybe it’s the cooler air, or maybe it’s just the excuse to spend afternoons surrounded by clay and color. This season, my table’s been covered in black, white, and golden-brown bits of polymer clay — zebra stripes mixing with leopard spots, each one a little different and a little wilder than the last. It’s messy, a bit chaotic, and honestly? That’s what I love most about it.

- The Fall Feeling That Started It All
- What You’ll Need Before You Start
- How to Make Zebra Print Polymer Clay Earrings
- How to Make Leopard Print Polymer Clay Earrings
- Finishing Touches — Adding a Hint of Resin
- Assembling & Styling Your Wild Prints
- Real-Life Tips You’ll Be Glad You Knew
- Final Thoughts: Where Wild Meets Warm
- Want More Clay & Resin Tips?
- FAQ: Polymer Clay & Resin Earrings
The Fall Feeling That Started It All
It actually started with one block of cinnamon-colored clay on my desk. Then I couldn’t help myself — I pulled out honey, ochre, amber, a bit of black and white — and suddenly my clay tray looked like a forest floor in late October.
Fall has always been my favorite season because it’s full of contrasts. It’s warm but crisp, calm but colorful — and that’s exactly what I wanted to capture with this collection. A little wild, a little refined, and totally cozy.
Zebra and leopard prints just fit. They bring the right amount of drama without being loud — the kind that makes your earrings pop against a chunky knit, a denim jacket, or, honestly, even your favorite mug of chai.
Some days the clay behaves beautifully, and other days it sticks to everything except what it should. I’ve learned to laugh about it. I make a mess, drink too much coffee, and somehow end up with something I actually love. That’s the charm of handmade — imperfect but honest.
What You’ll Need Before You Start
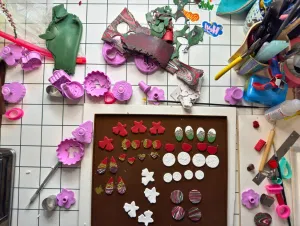
Before we dive into the fun part, let’s make sure you’ve got everything you need to bring your wild side to life.
Materials:
- Polymer clay (Fimo or Premo) — in white, black, tan, brown, and your fave fall tones
- Acrylic roller or pasta machine
- Craft blade or tissue blade
- Dotting tool / needle tool
- UV or epoxy resin (for that subtle gloss)
- Gold flakes or mica powder (optional but stunning)
- Earring posts + jump rings
- UV lamp (if using UV resin)
- Fine sandpaper (400–800 grit)
- Isopropyl alcohol + lint-free wipes
Optional but highly recommended: patience, coffee, and a playlist that makes you feel like an artist in a cozy cottage.
How to Make Zebra Print Polymer Clay Earrings
Step 1: Mix & Condition Your Clay
Start with black and white clay — the classic zebra combo — but don’t be afraid to add an autumn twist. A touch of ochre or soft beige under the white gives it a “lived-in” warmth.
Roll your clay sheets evenly. Cut thin strips of black, lay them on white, and press gently. Twist a little here, squish a bit there — zebras aren’t perfect, and neither should your pattern be.
Slice a cross-section of your layered clay — you’ll see your zebra stripes appear like magic.
Step 2: Shape & Bake
Cut your shapes: arches, ovals, irregular blobs — whatever fits your vibe.
Bake according to your clay brand’s instructions (usually 110–130 °C / 230–275 °F for 30 min).
Let them cool completely before sanding or finishing.
Pro tip: Don’t open the oven too early — sudden cool air can cause micro-cracks.
I shared a behind-the-scenes clip of this zebra pattern on Instagram — you can see the whole layering process here.
How to Make Leopard Print Polymer Clay Earrings
Step 1: Build the Spots
Leopard print is all about organized chaos.
Roll small dots of tan and caramel clay, then surround them with broken brown circles. The key is imperfection — that’s what makes it look real.
Flatten gently with your roller until you get a smooth surface, then backfill any gaps with neutral clay.
Step 2: Cut, Bake & Smooth
Cut your shapes (I love small domes and teardrops for leopard).
Bake, let cool, then sand the edges until smooth.
Brush on a little mica powder if you want that soft metallic shimmer when the light hits just right.
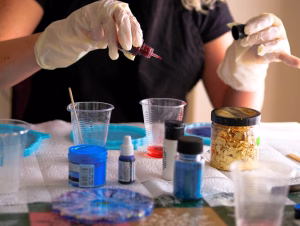
Finishing Touches — Adding a Hint of Resin
Here’s where the transformation happens. Resin turns your clay from cozy to chic.
I like brushing a thin layer of UV resin over just part of the surface — think of it as highlighting, not coating.
Cure it under a UV lamp for 60–90 seconds.
That small touch of gloss gives your earrings depth and movement, like sunlight catching fur. Subtle, but beautiful.
Every time I brush on that thin layer of resin, it feels a little magical. The matte clay suddenly catches light, and the whole piece changes personality. It’s one of those tiny studio moments that remind me why I started — the satisfaction of watching something simple turn beautiful.
Assembling & Styling Your Wild Prints
Once your pieces are cured and cool:
- Attach posts with UV resin or epoxy glue.
- Add jump rings for dangles or mix prints for a playful mismatched pair.
- Let the resin cure fully before wearing.
Styling tip: these wild prints love contrast. Try pairing them with chunky knits, corduroy, or soft suede tones. They’ll pop without overpowering your outfit.
And if you’re not the DIY type — don’t worry. You can grab ready-made pieces from the Wildberry Collection right here on Blueberry Bloom.
Real-Life Tips You’ll Be Glad You Knew
- Keep your clay dust-free — resin shows everything.
- Don’t over-condition your clay or it’ll turn too soft.
- Thin resin layers cure better than thick ones.
- Always test your pattern on a scrap first.
- Mix matte and gloss strategically — it makes your pieces look high-end.
Final Thoughts: Where Wild Meets Warm
This collection taught me that balance isn’t about perfection — it’s about contrast. Matte and glossy, bold and neutral, wild and cozy.
Every pair feels like fall to me — not just in color, but in energy. Warm, untamed, and a little magical.
So go ahead. Roll, slice, bake, and get a little wild. You might just surprise yourself.
Want More Clay & Resin Tips?
How to Embed Flowers in Resin Without Bubbles
Best Polymer Clay Brands for Jewelry
10 Mistakes to Avoid When Mixing Resin at Home
FAQ: Polymer Clay & Resin Earrings
Q: Can I skip the resin finish?
A: Totally. Try a satin glaze for a soft sheen instead.
Q: What’s the best clay brand for these prints?
A: Fimo Professional and Premo — they hold detail beautifully and stay color-true.
Q: How do I avoid fingerprints?
A: Wipe your hands and tools with alcohol before handling baked pieces.
Q: Can I mix leopard and zebra in one pair?
A: Definitely! Mixing zebra and leopard together can look amazing — it’s bold, but still balanced when you keep the colors cohesive.
Want to see how these designs turned out?
Explore the Wildberry Collection →