If you’ve ever wanted to make your own polymer clay earrings, this guide will show you how — from rolling your first piece of clay to putting on a pair you made yourself. It’s beginner-friendly, low-pressure, and surprisingly relaxing once you get into it. You don’t need fancy tools or an art background — just some curiosity, a bit of time, and a regular oven.
Skill Level: Beginner
Baking Temperature: 110–130°C (230–275°F)
Time Required: About 1 hour
Perfect For: Anyone who loves DIY, jewelry, or just needs a creative break
The first time I made earrings out of polymer clay, I was living in a tiny 30-square-meter apartment with my boyfriend. Definitely not a craft studio — more like a kitchen table squeezed between laundry and dinner. But I needed something creative to do with my hands, something that felt like me.
Most nights, I’d scroll Pinterest or fall down YouTube rabbit holes, watching people roll, cut, and bake these tiny pieces of art. Eventually, I just thought, “Why not me?” So I picked up a few blocks of clay and started experimenting.
Polymer clay quickly became my thing. It’s forgiving, satisfying, and full of little surprises. You can mix your own colors, carve out patterns, or try bold shapes — all with stuff you probably already have at home. No kiln, no expensive setup, no pressure.
Whether you’re just looking for a creative hobby or hoping to sell your own pieces one day, this step-by-step guide will walk you through everything I’ve learned about making polymer clay earrings from start to finish.

Why Polymer Clay?
Polymer clay is one of those materials that surprises you with how easy it is to work with — yet how professional it can look when finished.
It’s:
- Soft and easy to shape
- Durable once baked
- Great at holding texture
- Lightweight (even for big earrings)
- Bakeable right in your home oven (110–130°C or 230–275°F)
I’ve worn my own pieces swimming, sleeping, and even on long trips — they hold up beautifully. The best part? You can use everyday things to add texture: lace, fabric, even leaves. It’s such a freeing medium once you start experimenting.
Choosing the Right Polymer Clay
There are so many kinds of polymer clay out there — soft, squishy ones that almost melt in your hands, and firmer, professional-grade types that hold every little detail. When you’re just starting out, don’t overthink it. Pick a few different brands, play around, and see which one feels best to you.
Quick breakdown:
- Soft Clay: Great for mixing and shaping, but can stay a little bendy after baking.
- Medium-Firm Clay: Holds detail nicely and is perfect for beginners.
- Firm Clay: Takes more effort to condition but results in stronger pieces — especially for studs.
Quick tip: Sculpey Premo is a solid starting point. It’s smooth, strong, and not too hard to condition — perfect for your first few batches.
The Tools You Actually Need
You don’t have to buy a full kit to start making earrings. Here are the essentials:
- Acrylic roller (or a wine bottle in a pinch)
- Clay cutters or blades for clean shapes
- Sanding sponge or nail buffer for finishing
- Oven thermometer — trust me, your oven lies
- Needle tools for holes and texture
- Glue — we’ll get to the best kind below
- Silicone molds (optional) — great for consistent studs
Start with what you have. Upgrade slowly as you figure out what you enjoy making most.
Best Glues for Polymer Clay Earrings
Not all glues are equal — and I learned that the hard way when an earring post popped off mid-conversation (oops).
Here’s what actually works:
- Liquid Polymer Clay: Great for bonding unbaked layers together.
- Two-Part Epoxy Glue: Super strong and flexible — my personal favorite.
- Superglue: Quick fix, but it tends to get brittle over time.
If you want your earrings to last, epoxy is the way to go.
How to Make Polymer Clay Earrings – Step by Step
Step 1: Prepping Your Clay
Knead it until soft. Want to blend colors? Mix and fold until you like the look.
To add texture, press in lace, fabric, sandpaper, or natural elements like leaves.
Step 2: Shaping the Earrings
Studs: Use a small cutter or hand-form basic shapes
Floral details: Roll tiny petals, layer them into a bloom
Statement pieces: Cut bold shapes or sculpt freely
Step 3: Baking the Earrings
Follow the clay’s exact temp instructions—usually 110–130°C. Use:
- Parchment paper or ceramic tile as your baking surface
- A real oven (no microwaves—ever)
- An oven thermometer to be safe
Step 4: Sanding & Finishing
Once cooled, sand any rough edges. For shine, brush on a thin coat of resin or clay-safe varnish.
Want more detail? Here’s a full guide to sanding and polishing polymer clay earrings
Step 5: Assembling Your Earrings
Attach earring posts with strong glue
Use jump rings and hooks for dangles
Always double-check the bond before wearing or gifting
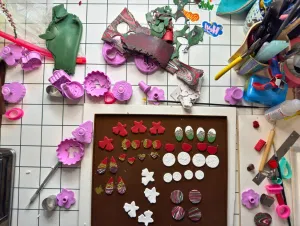
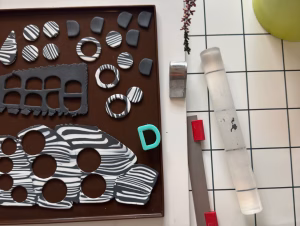
Need Ideas? Here’s Some Inspiration
If you’re unsure where to start, here are a few ideas to spark creativity:
- Minimalist Studs – Circles, arches, clean lines
- Textured Pieces – Lace, leaves, or stamps
- Floral Motifs – Soft, delicate petals
- Sculptural Statement Earrings – Chunky black clay or bold color
- Mixed Media Designs – Clay + resin + beads? Always a yes
Beginner Project Ideas to Try
Start with simple shapes like circles or half-moons. Try color-blocked layers, marbled effects, or pressed textures with lace or linen. If you’re feeling playful, mix in gold foil or tiny beads. Polymer clay is wonderfully forgiving — you can always re-roll and start again.
Avoid These Common Mistakes
- Overworking your clay until it gets sticky
- Guessing your oven temp (use a thermometer!)
- Using weak glue — go for epoxy
- Skipping sanding and finishing touches
- A few extra minutes of care make a huge difference in the final look.
Troubleshooting & Fixes for Polymer Clay Earrings
Even when you follow every step, little hiccups happen — that’s part of learning.
- Cracks: Usually from under-conditioning or sudden cooling. Warm it longer and let pieces cool in the oven.
- Too soft or sticky: Chill it in the fridge for 5–10 minutes.
- Uneven color: Fold instead of squish to mix.
- Posts falling off: Lightly sand before gluing, and use a two-part epoxy.
Every mistake teaches you something — and half the time, they turn out better than planned.
FAQ: Getting Started with Polymer Clay Earrings
Q: Is polymer clay beginner-friendly?
A: Absolutely. It’s soft, easy to shape, and you can bake it in your regular oven. No kiln needed!
Q: What’s the best clay for beginners?
A: Medium-firm clay like Sculpey Premo—it holds shape well but isn’t too hard to condition.
Q: How do I prevent cracking while baking?
A: Always use an oven thermometer to make sure your temp is accurate. Bake on parchment paper or a ceramic tile.
Q: Do I need special tools to get started?
A: Nope! Just a roller, cutter, needle tool, and strong glue will do. You can upgrade later.
Related Posts to Explore:
- Tips for Mixing Colors in Polymer Clay Jewelry
- Attaching Earring Posts to Polymer Clay Earrings
- From Matte to Glossy: Mixing Clay with Resin for Unique Earrings
Key Takeaways
- Polymer clay is beginner-friendly, affordable, and fun to experiment with.
- Conditioning and baking correctly make all the difference.
- Focus on smooth finishes and strong bonds for professional results.
- Most importantly: don’t wait until you feel “ready.” Just start creating.
Final Thoughts
Polymer clay is part art, part therapy. I started making pieces in a tiny apartment, music on, hands full of color. Hours would pass, and I’d look up to find earrings drying on every surface — and a happy kind of mess around me.
You don’t need to be an artist to make something beautiful. You just need to start. Roll out a bit of clay, pick a color that makes you smile, and see where it takes you.
And if you ever get stuck or need a bit of guidance — I’m just a message away.
Ready to Fall in Love with Your Next Favorite Pair?
You came for the clay tips, but let’s be real—your next earring crush might be waiting. Bold colors. Glossy finishes. Silhouettes that don’t play by the rules. Nothing basic in sight.
Take a scroll through the shop, pick your favorite berry, and let the bloom begin.