
There’s something about this time of year that always pulls me back into the studio a little more often. Maybe it’s the early darkness, the smell of cinnamon in the air, or the quiet excitement that slowly builds before Advent. This year, it started with a simple request: “Would you make some Christmas earrings for our local market?” A small, cozy Christmas market in a tiny village in the western part of Austria. Of course I said yes — those are my favorite ones.
Skill Level: Beginner → Intermediate
Bake Temperature: 110–130 °C (230–275 °F)
Time Needed: Around 3–5 hours (plus baking & optional sealing time)
Perfect For: Anyone who loves festive but wearable jewelry, neutral winter tones, and DIY Christmas earrings with a handmade feel.
Making DIY Christmas earrings for Christmas markets never feels like work to me. It feels like a ritual. I put on some music, line up my tools, and let myself enjoy the process without rushing. These pieces aren’t just jewelry; they’re meant to become little handmade gifts, something someone chooses carefully, maybe for a friend, maybe for themselves. That thought alone makes the whole process extra special.
This post is a mix of both worlds: the hands-on, step-by-step way I make my earrings, and the behind-the-scenes thoughts that go into preparing for the Christmas season. If you love making things with your hands or you’re curious about creating DIY Christmas earrings that feel festive but still wearable, let’s get into it.

- Why Christmas Earrings Make Such Lovely Handmade Gifts
- Finding Inspiration for DIY Christmas Earrings
- Tools and Materials I Use
- My Step-by-Step Way of Making DIY Christmas Earrings
- A) The Marbled Disc Dangles (Red + Swirl Circles)
- B) Mini Hoop Earrings (Red/Gold Half-Moon + Tiny Hearts)
- C) White Star Outline Earrings (Big White Stars)
- D) White + Silver Glitter Star Hoops
- E) White Embossed Studs
- F) Green + White Glitter Drops (With Little Star Tops)
- Preparing for a Christmas Market
- Why I Love Making Christmas Earrings Every Year
- More Clay & Jewelry Tips for the Christmas Season
- FAQ: DIY Christmas Earrings
Why Christmas Earrings Make Such Lovely Handmade Gifts
Christmas earrings are one of those small things that carry a lot of meaning. They’re easy to gift, easy to wear, and they instantly set a mood. At Christmas markets especially, people aren’t just shopping — they’re strolling, chatting, holding mugs of hot punch, and looking for something that feels personal.
That’s why handmade gifts in Austria, especially at village markets, still matter so much. People love knowing who made the piece, how it was created, and why it exists. Earrings fit perfectly into that space: affordable, thoughtful, and just festive enough without being over the top. I always try to design pieces that feel Christmassy, but that you can still wear long after the holidays are over.
Finding Inspiration for DIY Christmas Earrings
Before I touch any materials, I spend a little time just gathering ideas. Not in a strict way — more like letting the season sink in. Winter walks, old ornaments, wrapping paper patterns, even cookies can spark something.For this year’s Christmas market, I focused on a few simple themes:
- Stars and soft winter shapes
- Classic Christmas colors like deep red, white, green, and touches of gold
- Rounded, friendly forms that feel cozy rather than sharp
I like to keep things playful but calm. Christmas is already busy enough — the jewelry doesn’t need to shout.
Tools and Materials I Use
I’m a big believer in keeping things simple. You don’t need a massive setup to make beautiful DIY Christmas earrings.
Most of my pieces start with:
- Polymer clay in Christmas colors
- Basic cutters or a small blade
- Toothpicks or texture tools for details
- Jump rings and earring hooks
- A smooth surface to work on
- Sandpaper and a soft cloth for finishing
That’s really it. Over time, you learn what you personally love working with, but this setup works perfectly for market prep.
My Step-by-Step Way of Making DIY Christmas Earrings
Before I start, I usually pick a small “theme” so everything feels like it belongs together. For this batch, it was classic Christmas (red + green), plus winter white, plus a tiny bit of sparkle. Enough shine for the market lights, but still wearable.
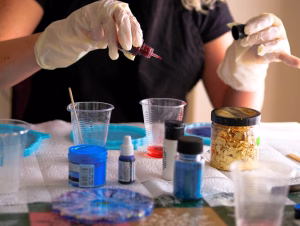
Conditioning + Color Plan
I conditioned my clay first (until it felt soft and smooth), then split it into a few main mixes:
- Deep red (for bold Christmas pieces)
- White (for winter shapes + studs)
- Green (for the snowy-green drops)
- Marbled mix (the swirly round discs + mini hearts)
- A little gold glitter / metallic detail for that “market sparkle”
The trick here is keeping the palette tight. Even when the shapes are different, the colors make it feel like one collection.
A) The Marbled Disc Dangles (Red + Swirl Circles)
These are the statement ones with the gold textured top, a red connector, and the marbled round disc.
How I made them:
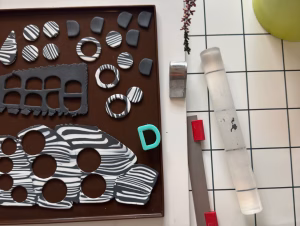
- Make the marbled sheet: I twisted thin ropes of red, green, white (and a darker shade if you want depth), folded it, twisted again, then rolled it flat. Don’t overmix — you want the swirls to stay visible.
- Cut the circles: I used a round cutter to cut two matching circles for each pair.
- Create the top pieces: I made the small top shapes (the gold textured ones) and added texture by pressing gently into the clay (you can use a textured tool or even a subtle dot/mesh texture).
- Add the red connector: That middle red piece helps break up the design and makes it look more “designed” (not just a charm stuck on a hook).
- Make holes before baking: I used a needle tool to make clean holes for jump rings. (I always do this before baking—less cracking later.)
- Bake, sand, assemble: After baking, I lightly sanded edges if needed, then assembled with jump rings + hooks.
Market tip: These catch attention fast because they move and they’re bold. Great “stop scrolling / stop walking” earrings.
B) Mini Hoop Earrings (Red/Gold Half-Moon + Tiny Hearts)
These are the cute little hoops in your photo — small, simple, and perfect for people who don’t want big statement earrings.
Red + Gold Half-Moon Hoops
- I shaped small half-moon drops in red.
- I added a gold accent (either metallic clay detail or a tiny gold sprinkle look).
- I made a hole at the top (small, neat), baked, then attached them to hoops.
Mini Marbled Hearts on Hoops
- I used the same marbled sheet from the disc earrings.
- Cut tiny hearts (or hand-shaped them if I wanted a softer look).
- Hole, bake, then attach to hoops.
These are amazing for Christmas markets because people love having a “small option” that still feels festive.
C) White Star Outline Earrings (Big White Stars)
These are super “winter wonderland.” They look bold but actually come together pretty easily.
- Roll white clay evenly (consistent thickness matters here).
- Cut the star shape and remove the center to create the outline look.
- Smooth the edges before baking (this saves sooo much sanding later).
- Bake, then attach to hooks.
If you want them to look extra clean, a quick gentle sanding on the inner edges makes them look professionally finished.
D) White + Silver Glitter Star Hoops
These are the ones with the half-glitter dipped look — sooo cute under market lights.
- I made small white stars.
- I added a “dipped” glitter section (either with glitter clay or a glitter layer after baking).
- Bake, then attach to hoops.
They feel festive without screaming “Santa costume,” which is honestly what a lot of shoppers want.
E) White Embossed Studs
These are the calm, classic ones — and people always buy studs at markets because they’re easy gifts.
- Roll white clay smooth.
- Press an embossing pattern in gently (you want it visible, not distorted).
- Cut circles, bake.
- Glue onto stud posts after baking (once fully cooled).
They’re perfect as a neutral winter pair that still feels special.
F) Green + White Glitter Drops (With Little Star Tops)
These are the snowy green ones from your other photo — they read like “Christmas tree + snow,” in the best way.
- I shaped oval drops in green.
- I added a white + glitter “snow top” (either as clay overlay or glitter finish).
- Baked, then connected them to little star studs using jump rings.
These are SUCH a good “Christmas market” design because they look seasonal without being too literal.
My Small Quality Rules (So They Last)
I keep pairs side-by-side while working so they match in size and shape.
I always make holes before baking.
I check jump rings are fully closed (no gaps).
Preparing for a Christmas Market
Making the earrings is only part of it. Preparing for a Christmas market has its own rhythm. I think about pricing that feels fair, packaging that protects the earrings but still looks nice, and displays that invite people to stop.
Why I Love Making Christmas Earrings Every Year
Even after all these years, making DIY Christmas earrings still makes me happy. Especially when it’s for a small market, where you recognize faces and hear stories. Someone buys earrings as a gift for their sister. Someone else treats themselves because they “deserve something nice.” Those moments stay with me.
That’s the real magic of handmade Christmas markets in Austria. It’s not about trends or perfection. It’s about connection, creativity, and slowing down — even just for a little while.
If you’re thinking about making your own Christmas earrings this season, I hope this encourages you to try. Let it be fun. Let it be imperfect. And most of all, let it feel like Christmas.
More Clay & Jewelry Tips for the Christmas Season
If you’re making earrings for Christmas — whether it’s for a market, gifts, or just a cozy afternoon at home — a few extra tips can really save time (and nerves). These are especially helpful during the busy holiday season when you’re making more than usual.
- How to Make Polymer Clay Earrings for Christmas Markets
A deeper look at choosing designs, colors, and finishes that work well under market lights and actually sell. - Christmas Color Palettes That Work for Polymer Clay Jewelry
Not everything has to be bright red and green. This post explores softer winter tones, whites, metallics, and muted Christmas combinations. - How to Add Glitter to Polymer Clay Without Overdoing It
Perfect if you love sparkle but still want your earrings to feel wearable and handmade. - How to Prep Handmade Earrings for Holiday Markets
Tips on finishing, checking quality, and packaging — especially useful when you’re making small batches for Christmas time.
These are the kinds of things I always come back to every December. A little planning goes a long way when your hands are full of clay and the oven is running nonstop.
FAQ: DIY Christmas Earrings
Q: How do you make Christmas earrings at home?
A: You can make Christmas earrings using polymer clay, beads, or charms. Shape simple festive designs, bake or cure them, then attach earring hooks with jump rings.
Q: How do you make handmade earrings?
A: Handmade earrings are made by shaping or assembling materials like clay, resin, or beads, finishing the surface, and adding hooks or studs.
Q: What is the easiest earring style to make?
A: Simple drop or stud earrings are the easiest to make. Flat polymer clay shapes or small charms are ideal for beginners.
Q: Is jewelry a good gift for Christmas?
A: Yes. Handmade jewelry, especially earrings, makes a thoughtful Christmas gift because it’s personal, wearable, and easy to gift.
Q: Are handmade Christmas earrings good for Christmas markets?
A: Absolutely. Handmade Christmas earrings are very popular at markets because they’re festive, affordable, and perfect as handmade gifts in Austria and beyond.
Q: Can beginners make DIY Christmas earrings?
A: Yes. Beginners can easily make DIY Christmas earrings by starting with simple shapes, basic tools, and classic holiday colors.
And if you’re in the mood for more, have a peek at some of my other earrings too.