If you’re new to polymer clay, this guide will walk you through how to mix colors with confidence — without overthinking it. You’ll learn simple blending techniques, marbling effects, and a few go-to color combos that always turn out beautiful.
Skill level: Beginner
Time required: 1–2 hours
Perfect for: Anyone who loves jewelry, color, and hands-on creativity.
If you ask me, this is where the magic really happens. Mixing colors in polymer clay is the part that feels the most creative, the least technical — like the moment you stop following someone else’s recipe and start trusting your hands.
Every time I mix clay, it turns into something a little different. You can try to copy the same blend twice, but it never comes out identical. And honestly? That’s the charm. Every earring, every swirl of color — a small surprise waiting in your oven.
When I first started working with clay, I thought there must be one “correct” way to mix colors. Turns out, there isn’t. There are just tiny discoveries, one after another — and that’s how you learn what you love.
How to Mix Colors in Polymer Clay
The first time you start mixing colors, it feels a little like painting — only instead of brushes, you’ve got your hands. The clay warms up, softens, and starts to feel alive. You roll, twist, fold, and suddenly, there’s a color that didn’t exist five minutes ago.
A few things I’ve learned along the way:
- Start small. Mix tiny amounts first. It’s easier to control and saves clay if you don’t love the shade.
- Warm your clay properly. Stiff clay doesn’t mix well. Knead it until it’s soft and pliable before blending.
- Twist, flatten, fold. Don’t rush it. Each motion brings the colors closer together.
- Change ratios as you go. Start 50/50, then add a little more of one color. Watch how quickly the mood of the color changes.
- Lighten or soften. A bit of white turns anything into a pastel; a hint of gray or black mutes the tone.
- Test first. Make a tiny batch before committing — it’ll save you from using up a whole block on a color you don’t love.
Mixing clay is one of those things you only get good at by feeling it. After a while, your hands start predicting what’ll happen before your head does.
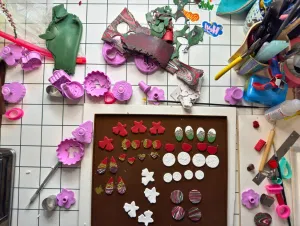
Techniques for Unique Color Patterns
Once you’ve found a color you love, that’s when the real fun begins. Polymer clay has this wonderful ability to surprise you every time you combine colors in a new way.
Here are a few techniques that never get old:
1. Marbling
A soft twist of two or three colors is all it takes. Don’t overmix — stop while the pattern still looks organic and flowing.
2. Gradient (Ombre) Blends
Roll out two sheets of color, press them together at the edges, and blend the seam. The fade between tones looks gorgeous on arches or statement earrings.
3. Terrazzo Effect
Use up your scraps. Chop them into tiny pieces and fold them into a neutral clay base. When you roll it flat, it looks like confetti set in stone — simple, modern, and full of personality.
4. Skinner Blend
If you have a pasta machine, this one’s addictive. Fold, roll, repeat — the color fade becomes smooth as silk.
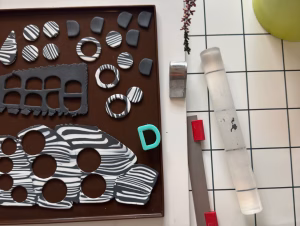
5. Striped or Layered Designs
Stack thin sheets, slice, rearrange, and see what happens. It’s part puzzle, part play. No two results look the same.
Need some visual guidance? I’ve found a few video tutorials that show the mixing process and pattern techniques really well.
A Quick Guide to Color Theory for Polymer Clay Artists
You don’t need to memorize a color wheel to make beautiful blends. Still, it helps to know why certain shades just work.
- Primary colors (red, blue, yellow): The base of everything. Mix any two and see what happens.
- Analogous colors: Colors sitting next to each other on the wheel — like pink and orange, or teal and green. They melt together naturally.
- Complementary colors: Opposites — blue and orange, purple and yellow. When used carefully, they make each other pop.
Polymer clay has its own quirks. It’s thicker than paint, less see-through, and sometimes shifts slightly when baked. That’s part of the fun — it keeps you guessing.
If you can, keep a small notebook or take photos of your color tests. The more you document, the faster you’ll notice patterns in your style. Maybe you lean toward earthy neutrals or muted tones — or maybe your best work comes out of chaos. Both are valid.
Foolproof Color Combos That Always Work
FIf your mind goes blank staring at a pile of clay, try one of these mixes. They always work:
- Soft Neutrals: Terracotta + ivory + warm gray
- Romantic Florals: Dusty rose + cream + sage
- Vibrant Pop: Teal + mustard + coral
- Cool Blues: Navy + sky + slate
- Citrus Brights: Lemon + coral + blush
Once you find a combo you like, tweak it. Add texture, sprinkle in gold leaf, or mix a translucent clay. Small changes can turn a nice blend into something completely new.
How to Avoid Common Mistakes
Even when you know what you’re doing, clay has a way of humbling you. Maybe the color turns muddy. Maybe your “perfect pastel” bakes a shade darker. It’s okay. Every mistake teaches you something.
Here are a few quick fixes:
- Muddy mix? You probably overmixed. Stop sooner next time, while you can still see the swirl.
- Clay won’t blend? It’s too cold or under-conditioned. Warm it up and knead longer.
- Too many colors? Stick to two or three while you’re learning. More than that, and things get complicated fast.
- Glue or surface issue? Save it. Sometimes those scraps become your next terrazzo batch.
Don’t rush to “fix” every error. Sometimes, the clay surprises you with something better than what you planned.
Get Inspired!
Color can feel intimidating until you stop trying to control it. Some of my best combinations came from total accidents — or from mixing scraps that weren’t meant to go together.
When you’re stuck, think about feeling, not formula:
- Soft & Dreamy: Peach, lavender, mint.
- Playful Energy: Fuchsia, bright blue, sunny yellow.
- Earthy Calm: Terracotta, ivory, chocolate brown.
- Moody Blues: Navy, denim, cloud gray.
Let your mood decide your palette. If you’re calm, go muted. If you’re restless, go bold. The color will follow how you feel — it always does.
FAQ: Mixing & Blending Polymer Clay Colors
Q: Can I blend any clay colors together?
A: Yes! Just make sure both are conditioned first. Start small, test your combo, and adjust as you go.
Q: How do I make pastel shades?
A: Add white clay little by little until the color softens to your liking. For muted tones, add a touch of gray or black instead.
Q: Why does my clay turn brown or muddy?
A: That usually means you overmixed or used too many colors. Keep it simple with two or three shades max.
Q: What’s a Skinner Blend?
A: It’s a pro technique where you fold and roll two colors repeatedly to create a perfect gradient from one tone to another.
Related Posts to Explore:
- Tips for Mixing Colors in Polymer Clay Jewelry
- How to Sand and Polish Polymer Clay Earrings for a Smooth Finish
- How to Make Polymer Clay Earrings: A Beginner’s Guide
Next Steps: Adding Texture
Once your clay is colored and conditioned, you can start layering in textures and details. Press in fabric or lace, carve tiny shapes, add resin for shine. This is where everything you’ve mixed starts to come alive.
The secret? Don’t aim for perfection. Aim for expression.
Final Thoughts
Mixing colors in polymer clay isn’t about getting it “right.” It’s about learning to notice — how the clay feels under your fingers, how two shades melt into a third, how a happy accident turns into a favorite design.
Each mix is a tiny story. A new possibility. And maybe, just maybe, the start of your next favorite pair of earrings.
So go ahead — grab your clay, make a mess, and let the colors take over for a while.
Quick Recap
- Mistakes? Keep them. They might turn into something better.
- Start small and experiment fearlessly.
- Keep your blends simple — two or three colors at a time.
- Take notes or photos to find your own palette.